DIY Paw Print Rubber Stamp
My sweet Lily had become sick with kidney disease and I feared she wasn't going to be around much longer, sadly. I was about to go out of town for a week and I was scared something might happen to her while I was gone, so I made a mold of her paw. I am so glad I did. She took a turn for the worse and I changed my plane ticket to come to her side but she died while I was in route home... she was only 7.
I am brokenhearted, but that is another blog series.

In this project, I want to make a rubber stamp of my dog's paw print. Yes, I could just ink up my dog's paw and make a paw print and scan it into the computer, but I wanted a little something different. I wanted to be able to stamp whatever I wanted and printing a paw print may not work for everything- so this is what I came up with.

I recommend any pet lover to make a paw mold while your pet is still happy and healthy. It will save you are a lot of heartache later.

Lily modeling for one of my earlier projects!
This may seem like a lot of steps to get to the end results but you end up with multiple use pieces along the way. So I have made this in a two part series.
Part 1 – The molds
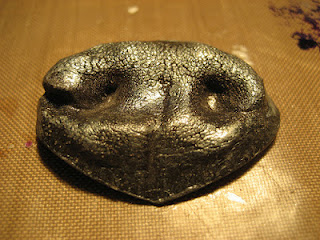
I first made a mold of her paw with Amazing Mold Putty {please CLICK HERE to view mixing/preparation}. I recommend that you write the date, "original" and pet's name on the back of the mold.

Mold #1 – the Original
Then make a cast using resin. You will use the cast to make the rubber stamp. Make sure it comes out good, the next steps involve this first generation cast.
For the first cast I made – I used Amazing Casting Resin with black dye, and I put fine black glitter in the mold. Since my pup had black paws I thought this was adorable! I always tend to jump the gun and should have waited to make this cast until after I made my cast for the rubber stamp. It really doesn't matter except that my rubber stamp cast now has some black glitter in it.

Then I made the cast for the rubber stamp mold.
This is why you see some remnants of glitter in the cast piece.

With this cast, you will make a second mold with Amazing Mold Putty.
With the resin casting made from the first mold, we are making a second mold – because the following steps are a bit tricky and you could ruin your mold. This way you always have your "original" saved somewhere that you can use to make another cast.

Mold #2
Part 2: The Stamp
Now that you have your second mold you are going use a mold release and spray several coats inside your silicone mold.
After they mold release dries, mix a small amount of Amazing Mold Rubber (follow the directions on the box for mixing small amounts). Pour into mold and allow to cure.

Don't try to de-mold too soon. Let it cure overnight.
The gently pull the rubber out of the mold. You may have some areas where the silicone mold sticks to the rubber. But if you used the mold release it shouldn't be too bad.
THIS IS WHY WE DIDN'T USE OUR ORIGINAL MOLD!!!!
If you don't use a mold release or not enough mold release, the Amazing Mold Rubber will fuse to the Amazing Mold Putty making a solid rubber block.

Tape your rubber paw to an acrylic block.

Ink up with a permanent ink.

Make your print.
It may take a few tries to get a good print.

I scanned my print into the computer to make some background paper.

I also printed a laser print of my beloved Lily and mod podged it to a vase.

I used the paw print paper to fill in some of the empty space
and embellished with the black glittered resin paw.


Go Craft Your Own Way!
~ Tanya

Comments